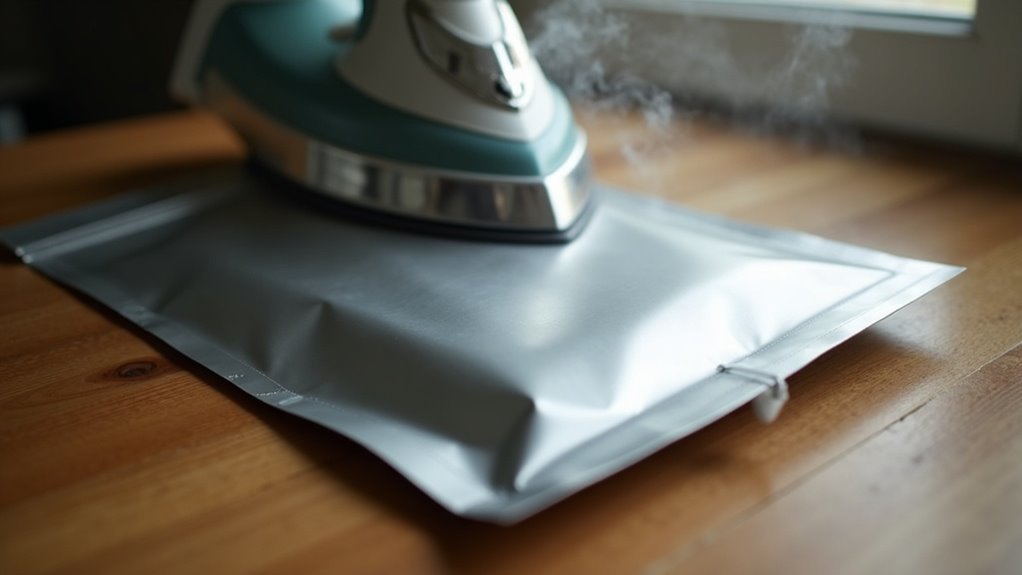
To seal Mylar bags for long-term food storage, first gather food-grade Mylar bags and oxygen absorbers, essential for preserving your supplies. Set your household iron to medium-high heat without steam—this is crucial for an effective seal. Fill the Mylar bag with your chosen food items, leaving 3-4 inches at the top for sealing. Next, place an oxygen absorber inside to eliminate excess air, which can lead to spoilage. Fold the top flap down and apply the iron for 5-10 seconds, ensuring a tight seal against potential pests and moisture. Allow the bag to cool completely and check for any leaks to ensure your food remains safe and viable. By following these steps carefully, you can also explore additional sealing techniques to enhance the longevity and security of your food supplies, a vital aspect of any prepping strategy.
Key Takeaways
- Set your household iron to medium-high heat and make sure to turn off the steam function for a strong, reliable seal that will keep your supplies secure.
- Fill the Mylar bag, leaving 3-4 inches at the top for proper sealing, and insert an oxygen absorber to protect your food from spoilage during long-term storage.
- Position the bag on a clean towel to prevent contamination, and fold the flap carefully to ensure you create a straight, uniform seal for maximum preservation.
- Firmly press the iron on the flap for 5-10 seconds, moving slowly to ensure even heat distribution across the entire sealing area.
- Allow the bag to cool completely before testing the seal by gently pressing on the edges; a successful seal is crucial for effective food storage in your prepping supplies.
Materials and Tools Needed for Sealing Mylar Bags
To effectively seal Mylar bags for long-term food storage and survival preparedness, you’ll need a few essential materials and tools.
Begin with food-grade Mylar bags, preferably 3.5 – 7 mil thick, which provide the durability necessary for extended preservation.
Oxygen absorbers are crucial; opt for sizes like 100cc for 1-pint bags and 300cc for 1-quart bags to eliminate oxygen and prevent spoilage.
A household iron or hair straightener serves as a reliable sealing tool, so set it to medium-high heat for optimal results.
Remember to use a clean towel or flat board to apply even pressure while sealing, ensuring a tight closure.
Lastly, keep scissors handy to trim the edges of the Mylar bags for a secure seal after filling, as this ensures your food supply remains protected in any survival situation.
Step-by-Step Process for Sealing Mylar Bags
To seal Mylar bags effectively for your survival and prepping needs, you need to gather your materials and understand the proper sealing techniques.
Start by preparing your workspace in a clean and dry area to ensure no contaminants compromise your food storage. Confirm that your iron is set to the appropriate temperature, as this is crucial for creating an airtight seal that will protect your supplies.
Once you’ve sealed the bags, it’s essential to test the seal to guarantee the freshness and protection of your stored items, ensuring they remain viable for long-term storage in any survival situation.
Gather Necessary Materials
Before you begin sealing your Mylar bags for long-term food storage, it’s crucial to gather the right materials to ensure success in your survival preparations.
Start with food-grade Mylar bags, preferably 3.5 to 7 mil thick, making sure they’re clean and dry to maintain the integrity of your supplies.
Next, obtain oxygen absorbers specific to the volume of your bags; for example, use 100cc for 1-pint bags and 500cc for 1-gallon bags.
You’ll also need a clothes iron set to medium-high heat with the steam function turned off, as well as a flat, stable surface for sealing.
Finally, fill the Mylar bag, leaving 3-4 inches at the top, and place the oxygen absorber on the contents before sealing to protect your food from spoilage and pests.
These steps are vital for effective long-term food storage and preparedness.
Sealing Techniques Explained
Once you’ve gathered your materials, it’s time to focus on the sealing process for your Mylar bags, an essential step in long-term food storage for your preparedness plan. Set your household iron to medium-high heat and turn off the steam to ensure a strong seal. Place a clean towel on a flat surface, positioning the Mylar bag with a 4 to 6-inch space at the top. Fold the flap carefully, ensuring it aligns for a straight seal which is crucial for preventing air and moisture from compromising your supplies. Press the iron on the flap for 5 to 10 seconds, moving slowly to allow for even heat distribution. Allow the seal to cool completely before testing to ensure it is airtight.
| Step | Action | Time |
|---|---|---|
| Preheat Iron | Set to medium-high, steam off | N/A |
| Position Bag | Place on towel, fold top for sealing | N/A |
| Heat Seal | Press iron for 5-10 seconds | 5-10 seconds |
Testing the Seal
After you’ve sealed your Mylar bags, it’s crucial to verify that the seal is airtight for effective long-term food storage.
Begin by allowing the bags to cool completely to ensure the integrity of the seal. Next, gently press on the sealed edge; a proper seal should feel firm and prevent any air from escaping, which is vital for preserving your food supply.
If you identify any leaks, re-seal that area with the iron, making sure the edges are clean and aligned to achieve a proper seal.
Additionally, be sure to label the bags with their contents and sealing date for easy identification during emergencies.
Regularly inspect your bags for any signs of damage or seal failure, as maintaining your food storage is essential for your survival preparedness.
Sealing Techniques and Common Mistakes to Avoid
When sealing Mylar bags for long-term food storage, it’s essential to employ the right techniques to prevent common mistakes that can jeopardize your supplies.
Set your household iron to medium-high heat, ensuring it doesn’t produce steam, as steam can weaken the seal. Lay a clean towel on a flat surface to create a stable workspace, then place the Mylar bag on it.
Fold the top of the bag to create a narrow flap, and press the iron along the flap for 5 to 10 seconds to ensure a secure seal. Be cautious not to overfill the bag, as this can lead to air pockets that compromise the integrity of the seal.
After sealing, always test the bag by gently squeezing it; a properly sealed Mylar bag should feel tight with no air escaping, ensuring your food remains preserved for emergencies.
Long-Term Storage and Preservation Techniques
To effectively preserve food for the long haul, understanding the interplay between Mylar bags and oxygen absorbers is essential in the world of survivalism and prepping.
When utilized correctly, these methods can keep your food fresh for decades. Here are key strategies for successful long-term food storage:
- Select the right size of oxygen absorbers to pair with your Mylar bags.
- Ensure to leave 3 to 4 inches of space at the top of the bags for sealing.
- Store your sealed Mylar bags in a cool, dark, and dry environment to enhance their longevity.
- Avoid overfilling the bags to ensure effective sealing and prevent spoilage.
- Regularly inspect for any signs of damage or compromised seals to maintain food integrity.
How to Seal Mylar Bags With a Clothes Iron at Home
To seal Mylar bags at home with a clothes iron, especially for your survival and prepping needs, you’ll need a few essential materials and tools.
Start by gathering your Mylar bags and a clean towel to provide stability during the sealing process, ensuring that your food supplies remain protected from moisture and pests.
Once you’re prepared, follow these step-by-step instructions to achieve an airtight seal, which is crucial for long-term food storage and emergency preparedness.
Required Materials and Tools
Sealing Mylar bags at home is a crucial skill for any survivalist or prepper looking to preserve food and supplies effectively. To ensure an airtight closure, you’ll need the following essential materials and tools:
- Clean, dry Mylar bags
- Oxygen absorbers to extend shelf life
- A household iron (set to medium-high heat)
- A clean towel or flat surface for stability
- A vacuum sealer (optional, but beneficial for air removal)
When filling your Mylar bag, make sure to leave 3-4 inches of space at the top. Including an oxygen absorber is vital for long-term storage, as it helps prevent spoilage.
With these materials at hand, you’ll be well-equipped to create a reliable seal that protects your critical items from environmental factors. Mastering this process is a key step in your preparedness journey.
Step-by-Step Sealing Process
Ready to secure your Mylar bags for long-term food storage? Start by setting your household iron to medium-high heat without steam, ensuring you’re prepared for effective preservation.
Place a clean towel on a flat, sturdy surface, then lay the Mylar bag on top, leaving 4 to 6 inches at the top for sealing. Fold the bag’s top to create a narrow flap, and press the iron along the flap for 5 to 10 seconds, moving slowly to ensure even heat distribution.
Once sealed, allow the bag to cool completely to maintain its integrity. To ensure your supplies are safe, test for leaks by gently squeezing the bag to check for any air.
For the best results in your prepping endeavors, practice on scrap material to fine-tune heat settings and sealing time as needed.
Expert Tips for Effective Sealing
While sealing Mylar bags may appear simple, adhering to expert tips can significantly improve your results, especially for those focused on survivalism and prepping.
Here are five effective sealing strategies to ensure your food supplies remain intact:
- Set your iron to medium-high heat and deactivate the steam function to prevent moisture intrusion.
- Use a clean towel on a flat surface to stabilize the Mylar bag, ensuring a smooth sealing process.
- Leave 3–4 inches of space at the top of the bag and fold it down for easier sealing, which is crucial for creating an airtight environment.
- Press the iron along the folded flap for 5 to 10 seconds, moving slowly for even heat distribution and a strong seal.
- After sealing, allow the bag to cool completely and inspect for any leaks to confirm an airtight seal, vital for long-term food storage.
These tips will enhance your sealing process, helping you secure your emergency food supplies effectively!
Contact Information for Further Assistance
Need assistance with sealing Mylar bags for your survival supplies or have questions about the process?
You can contact Pleasant Grove Farm LLC at 919-925-2160 during operating hours, Monday to Friday, from 10:00 AM to 7:00 PM.
Contact Pleasant Grove Farm LLC at 919-925-2160, Monday to Friday, 10 AM to 7 PM for assistance.
For email inquiries related to sealing or other prepping topics, reach out at pleasantgrovefarmnc@gmail.com.
If you prefer in-person assistance, visit their physical address at 1101 S. Franklin Drive, Sanford, NC 27330.
Additionally, you may find support options at Glasgow str. 45.
Remember to check the guidance provided with your Mylar bag purchase for specific sealing techniques or troubleshooting assistance to ensure your supplies are properly preserved for your preparedness needs!